Containerd简明教程
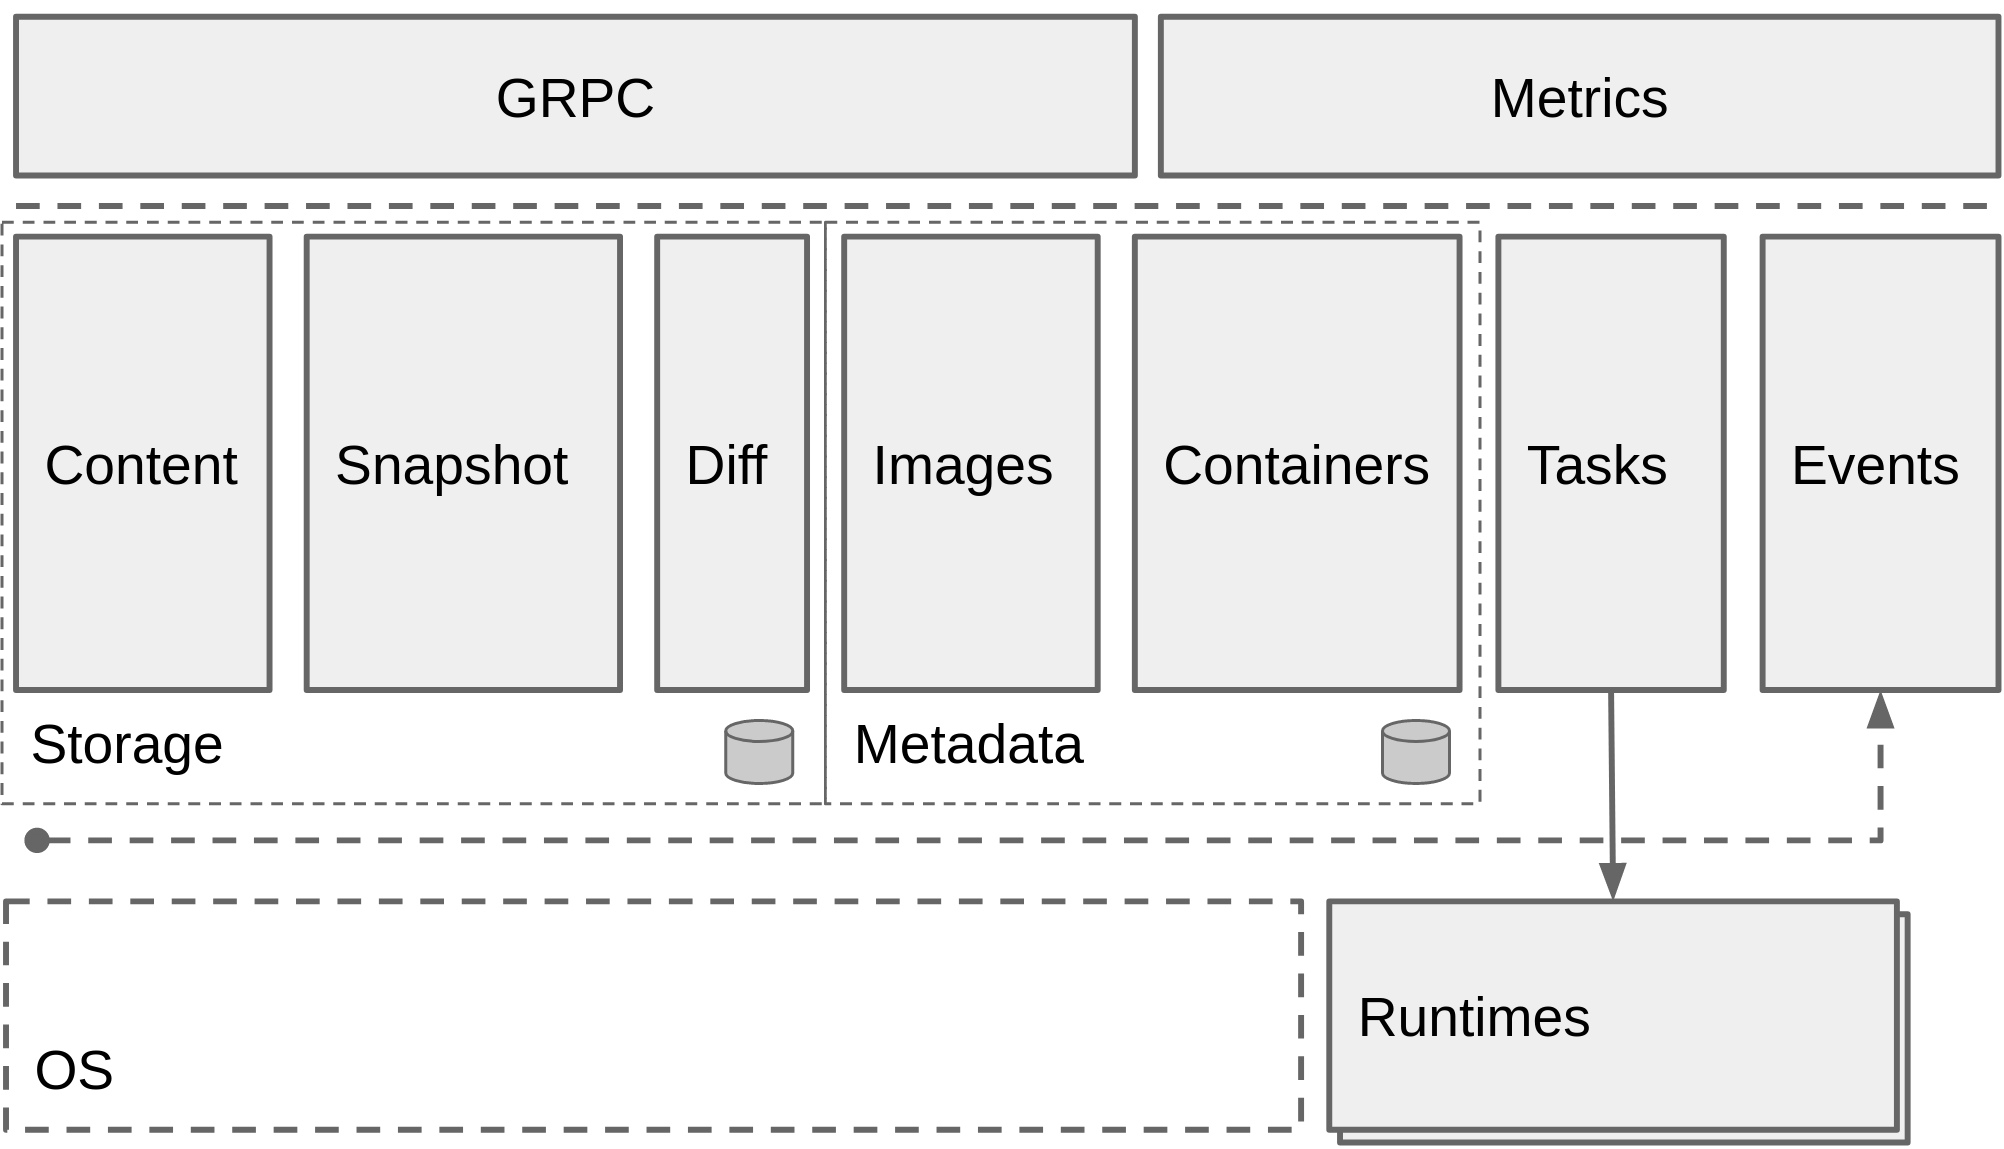
最近在玩这个玩意儿,准备在此之上开发自己的容器编排系统 huang。这里简单看一下containerd 的使用。containerd是从Docker分离出来的一个用于容器、镜像增删改查的程序,这是它的架构图:

安装
我是使用ArchLinux,因此可以直接安装:
$ sudo pacman -S containerd
resolving dependencies...
looking for conflicting packages...

Packages (2) runc-1.0.0rc6-1  containerd-1.2.0-3

Total Installed Size:  108.18 MiB

:: Proceed with installation? [Y/n]
(2/2) checking keys in keyring                                                                          [##############################################################] 100%
(2/2) checking package integrity                                                                        [##############################################################] 100%
(2/2) loading package files                                                                             [##############################################################] 100%
(2/2) checking for file conflicts                                                                       [##############################################################] 100%
(2/2) checking available disk space                                                                     [##############################################################] 100%
:: Processing package changes...
(1/2) installing runc                                                                                   [##############################################################] 100%
(2/2) installing containerd                                                                             [##############################################################] 100%
:: Running post-transaction hooks...
(1/2) Reloading system manager configuration...
(2/2) Arming ConditionNeedsUpdate...
也可以自己下载二进制包,也可以把二进制文件放到 $PATH 里包含的文件夹之一例如 /usr/local/bin 中,然后把对应的
systemd service文件也拷贝到对应的位置。
使用默认配置:
# containerd config default > /etc/containerd/config.toml
使用containerd
我们使用这段代码来连接containerd并且拉取一个redis镜像:
package main

import (
	"context"
	"log"

	"github.com/containerd/containerd"
	"github.com/containerd/containerd/namespaces"
	"github.com/containerd/containerd/oci"
)

func main() {
	if err := redisExample(); err != nil {
		log.Fatal(err)
	}
}

func redisExample() error {
	client, err := containerd.New("/run/containerd/containerd.sock") // 连接到containerd默认监听的地址
	if err != nil {
		return err
	}
	defer client.Close()

	ctx := namespaces.WithNamespace(context.Background(), "example") // 使用一个独立的namespace防止冲突
	image, err := client.Pull(ctx, "docker.io/library/redis:alpine", containerd.WithPullUnpack)
	if err != nil {
		return err
	}
	log.Printf("Successfully pulled %s image\n", image.Name())

	// 创建一额容器
	container, err := client.NewContainer(
		ctx,
		"redis-server",
		containerd.WithNewSnapshot("redis-server-snapshot", image),
		containerd.WithNewSpec(oci.WithImageConfig(image)),
	)
	if err != nil {
		return err
	}
	defer container.Delete(ctx, containerd.WithSnapshotCleanup) // 记得把容器删了
	log.Printf("Successfully created container with ID %s and snapshot with ID redis-server-snapshot", container.ID())

	return nil
}
执行一下:
$ go build main.go
$ sudo ./main
[sudo] password for jiajun:
2019/02/27 23:44:40 Successfully pulled docker.io/library/redis:alpine image
2019/02/27 23:44:40 Successfully created container with ID redis-server and snapshot with ID redis-server-snapshot
检查一下镜像是否拉下来了:
$ sudo ctr -n example images ls
REF                            TYPE                                                      DIGEST                                                                  SIZE     PLATFORMS                                                                   LABELS
docker.io/library/redis:alpine application/vnd.docker.distribution.manifest.list.v2+json sha256:3fa51e0b90b42ed2dd9bd87620fe7c45c43eb4e1f81c83813a78474cbe2f7457 16.9 MiB linux/386,linux/amd64,linux/arm/v6,linux/arm64/v8,linux/ppc64le,linux/s390x -
注意其中的 -n example,因为代码中,我们就使用了 example 这个namespace,如果不加这一行我们是看不到结果的,因为默认的namespace
是 default。
Task
Container是永驻的,Task相当于一条临时命令,例如执行 docker exec -it 的时候。这个例子可以看得出来:
package main

import (
	"context"
	"fmt"
	"log"
	"syscall"
	"time"

	"github.com/containerd/containerd"
	"github.com/containerd/containerd/cio"
	"github.com/containerd/containerd/namespaces"
	"github.com/containerd/containerd/oci"
)

func main() {
	if err := redisExample(); err != nil {
		log.Fatal(err)
	}
}

func redisExample() error {
	// create a new client connected to the default socket path for containerd
	client, err := containerd.New("/run/containerd/containerd.sock") // 连接containerd默认地址
	if err != nil {
		return err
	}
	defer client.Close()

	// create a new context with an "example" namespace
	ctx := namespaces.WithNamespace(context.Background(), "example") // 使用example命名空间

	// pull the redis image from DockerHub
	image, err := client.Pull(ctx, "docker.io/library/redis:alpine", containerd.WithPullUnpack) // 拉镜像
	if err != nil {
		return err
	}

	// 创建容器
	container, err := client.NewContainer(
		ctx,
		"redis-server",
		containerd.WithImage(image),
		containerd.WithNewSnapshot("redis-server-snapshot", image),
		containerd.WithNewSpec(oci.WithImageConfig(image)),
	)
	if err != nil {
		return err
	}
	defer container.Delete(ctx, containerd.WithSnapshotCleanup)

	// 连上容器的stdio
	task, err := container.NewTask(ctx, cio.NewCreator(cio.WithStdio))
	if err != nil {
		return err
	}
	defer task.Delete(ctx)

	// make sure we wait before calling start
	exitStatusC, err := task.Wait(ctx)
	if err != nil {
		fmt.Println(err)
	}

	// call start on the task to execute the redis server
	if err := task.Start(ctx); err != nil {
		return err
	}

	// sleep for a lil bit to see the logs
	time.Sleep(3 * time.Second)

	// kill the process and get the exit status
	if err := task.Kill(ctx, syscall.SIGTERM); err != nil {
		return err
	}

	// wait for the process to fully exit and print out the exit status

	status := <-exitStatusC
	code, _, err := status.Result()
	if err != nil {
		return err
	}
	fmt.Printf("redis-server exited with status: %d\n", code)

	return nil
}
执行一下:
$ sudo ./main
1:C 27 Feb 2019 23:52:08.999 # oO0OoO0OoO0Oo Redis is starting oO0OoO0OoO0Oo
1:C 27 Feb 2019 23:52:08.999 # Redis version=5.0.3, bits=64, commit=00000000, modified=0, pid=1, just started
1:C 27 Feb 2019 23:52:08.999 # Warning: no config file specified, using the default config. In order to specify a config file use redis-server /path/to/redis.conf
1:M 27 Feb 2019 23:52:09.002 # You requested maxclients of 10000 requiring at least 10032 max file descriptors.
1:M 27 Feb 2019 23:52:09.002 # Server can't set maximum open files to 10032 because of OS error: Operation not permitted.
1:M 27 Feb 2019 23:52:09.002 # Current maximum open files is 1024. maxclients has been reduced to 992 to compensate for low ulimit. If you need higher maxclients increase 'ulimit -n'.
1:M 27 Feb 2019 23:52:09.003 * Running mode=standalone, port=6379.
1:M 27 Feb 2019 23:52:09.003 # WARNING: The TCP backlog setting of 511 cannot be enforced because /proc/sys/net/core/somaxconn is set to the lower value of 128.
1:M 27 Feb 2019 23:52:09.003 # Server initialized
1:M 27 Feb 2019 23:52:09.003 # WARNING overcommit_memory is set to 0! Background save may fail under low memory condition. To fix this issue add 'vm.overcommit_memory = 1' to /etc/sysctl.conf and then reboot or run the command 'sysctl vm.overcommit_memory=1' for this to take effect.
1:M 27 Feb 2019 23:52:09.003 # WARNING you have Transparent Huge Pages (THP) support enabled in your kernel. This will create latency and memory usage issues with Redis. To fix this issue run the command 'echo never > /sys/kernel/mm/transparent_hugepage/enabled' as root, and add it to your /etc/rc.local in order to retain the setting after a reboot. Redis must be restarted after THP is disabled.
1:M 27 Feb 2019 23:52:09.003 * Ready to accept connections
1:signal-handler (1551325932) Received SIGTERM scheduling shutdown...
1:M 27 Feb 2019 23:52:12.113 # User requested shutdown...
1:M 27 Feb 2019 23:52:12.113 * Saving the final RDB snapshot before exiting.
1:M 27 Feb 2019 23:52:12.127 * DB saved on disk
1:M 27 Feb 2019 23:52:12.127 # Redis is now ready to exit, bye bye...
redis-server exited with status: 0
 邮件 订阅
邮件 订阅
 RSS 订阅
 Web开发简介系列
 数据结构的实际使用
 Golang 简明教程
 Python 教程