ElasticSearch学习笔记
搭建单节点ES
用Docker来搭建是比较简单的方式:
$ docker pull elasticsearch
$ docker run -d --name elasticsearch -p 9200:9200 -p 9300:9300 -e "discovery.type=single-node" elasticsearch
基本概念
ES引入了几个新的概念,我们和数据库对比一下:
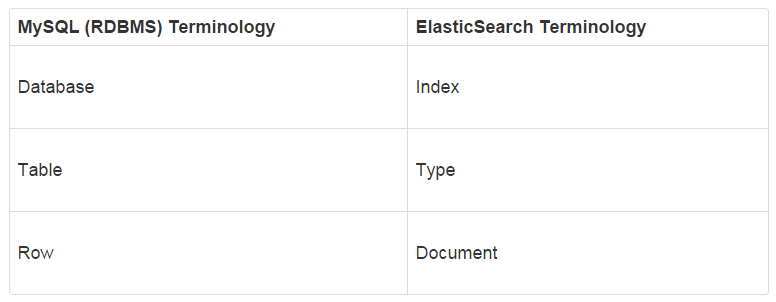
可以看到ES对应数据库的概念,然后看下ES在URL里如何对应这些概念:
http://host:port/[index]/[type]/[_action/id]
还有一个概念就是document,其实就是每一个JSON就是一个document。比如插入一个document:
$ http POST :9200/customer/doc2/1 name="John Doe"
这里,customer 就是index,doc2就是type,1 就是id,如果不想指定id,想要实现数据库里自增id的方式,就这样:
$ http POST :9200/customer/doc/ name="John Doye"
HTTP/1.1 201 Created
Location: /customer/doc/AXMTYwk4PDh6wP1Uklpb
content-encoding: gzip
content-length: 156
content-type: application/json; charset=UTF-8

{
    "_id": "AXMTYwk4PDh6wP1Uklpb",
    "_index": "customer",
    "_shards": {
        "failed": 0,
        "successful": 1,
        "total": 2
    },
    "_type": "doc",
    "_version": 1,
    "created": true,
    "result": "created"
}
看,返回结果中, 就会把自动生成的id一起返回。 获取文档就要用到这个id:
$ http :9200/customer/doc/AXMTYwk4PDh6wP1Uklpb
HTTP/1.1 200 OK
content-encoding: gzip
content-length: 137
content-type: application/json; charset=UTF-8

{
    "_id": "AXMTYwk4PDh6wP1Uklpb",
    "_index": "customer",
    "_source": {
        "name": "John Doye"
    },
    "_type": "doc",
    "_version": 1,
    "found": true
}
搜索
ES本身就是为了搜索的,我们来看下如何搜索,搜索就是往 _search 这个endpoint请求:
$ http :9200/customer/_search
HTTP/1.1 200 OK
content-encoding: gzip
content-length: 258
content-type: application/json; charset=UTF-8

{
    "_shards": {
        "failed": 0,
        "skipped": 0,
        "successful": 5,
        "total": 5
    },
    "hits": {
        "hits": [
            {
                "_id": "AXMTWg-BPDh6wP1UklpX",
                "_index": "customer",
                "_score": 1.0,
                "_source": {
                    "name": "John Doge"
                },
                "_type": "doc"
            },
            {
                "_id": "2",
                "_index": "customer",
                "_score": 1.0,
                "_source": {
                    "name": "John Dog"
                },
                "_type": "doc"
            },
            {
                "_id": "AXMTYwk4PDh6wP1Uklpb",
                "_index": "customer",
                "_score": 1.0,
                "_source": {
                    "name": "John Doye"
                },
                "_type": "doc"
            },
            {
                "_id": "1",
                "_index": "customer",
                "_score": 1.0,
                "_source": {
                    "name": "John Doe"
                },
                "_type": "doc"
            },
            {
                "_id": "1",
                "_index": "customer",
                "_score": 1.0,
                "_source": {
                    "name": "John Doe"
                },
                "_type": "doc2"
            },
            {
                "_id": "_create",
                "_index": "customer",
                "_score": 1.0,
                "_source": {
                    "name": "John Doge"
                },
                "_type": "doc"
            }
        ],
        "max_score": 1.0,
        "total": 6
    },
    "timed_out": false,
    "took": 62
}
瞧,这样,不带条件,就把所有的文档搜出来了。如果只想搜索一个 type 里的,那就:http :9200/customer/doc2/_search。
如果想搜索整个ES里的,那就:http :9200/_search。
更复杂的搜索,就要用到Elastic的Query DSL来进行操作了。
Query DSL
Query DSL比较灵活,代价就是相对复杂,其实是用JSON的形式,来表达查询规则。分为两种:
- query。query会模糊查找文档,然后根据匹配程度有一个打分,根据打分来排序。
- filter。filter就是看是否匹配,结果要么匹配,要么不匹配。相对简单。
最简单的DSL如下:
{
  "query":{
    "match_all": {}
  }
}
作用就是查询所有的文档。
分页
可以根据 size 和 from 来指定从何处开始取结果,取多少:
$ cat query.json
{
  "query":{
    "match_all": {}
  },
  "from": 2,
  "size": 1
}

$ http GET :9200/_search < query.json
HTTP/1.1 200 OK
content-encoding: gzip
content-length: 203
content-type: application/json; charset=UTF-8

{
    "_shards": {
        "failed": 0,
        "skipped": 0,
        "successful": 5,
        "total": 5
    },
    "hits": {
        "hits": [
            {
                "_id": "AXMTYwk4PDh6wP1Uklpb",
                "_index": "customer",
                "_score": 1.0,
                "_source": {
                    "name": "John Doye"
                },
                "_type": "doc"
            }
        ],
        "max_score": 1.0,
        "total": 6
    },
    "timed_out": false,
    "took": 2
}
查询条件
除了上面的 match_all,ES还有好几个查询语句,他们都是放在 query 里面,我们来看看:
match_all: 查询全部match: 简单匹配multi_match: 在多个字段上执行相同的match查询query_string: 可以在查询里边使用AND或者OR来完成复杂的查询term: term可以用来精确匹配,精确匹配的值可以是数字、时间、布尔值range: range用来查询落在指定区间内的数字或者时间bool: bool可以通过must,must_not,filter,should把多个查询条件组合起来
聚合
聚合查询就更强大了,这个还是直接看文档吧:https://www.elastic.co/guide/en/elasticsearch/reference/current/search-aggregations.html
ref:

 邮件 订阅
邮件 订阅
 RSS 订阅
 Web开发简介系列
 数据结构的实际使用
 Golang 简明教程
 Python 教程