OAuth 2 详解(一):简介及 Authorization Code 模式
在这个系列里,我们主要讲解 RFC6749 中定义的四种授权模式, 以及 RFC7636 中定义的 PKCE 模式。这篇文章中,我们将会介绍第一种模式: Authorization Code Flow。不过在此之前,我们需要介绍一些前置概念,方便理解。
前置概念介绍
OAuth 2.0 中一共定义了这么几个角色:
Resource Owner: An entity capable of granting access to a protected resource. When the resource owner is a person,it is referred to as an end-user. 说人话,绝大部分场景下,资源所有者就是指用户,也就是帐号所有者。比如用 Github帐号授权登录的你,用Gmail授权登录的她。Client: An application making protected resource requests on behalf of the resource owner and with its authorization. The term “client” does not imply any particular implementation characteristics (e.g.,whether the application executes on a server,a desktop,or other devices). 说人话,就是发起授权请求的客户端,比如想要 用Gmail登录MongoDB的云服务。那么MongoDB的网页端,就是Client。Resource Server: The server hosting the protected resources,capable of accepting and responding to protected resource requests using access tokens. 授权资源所在的服务器,通常从我们看到的域名,Resource Server和Authorization Server会是同一个域名。但是他们其实是不同的东西,最简单的例子:Gmail登录之后,获取Google帐号用户资料。 用户资料API 所在的服务器,就是Resource Server。Authorization Server: The server issuing access tokens to the client after successfully authenticating the resource owner and obtaining authorization. 颁发 Access Token 的服务器,就是Authorization Server。对于上面的例子来说, Google 的鉴权服务器负责颁发Token,那么鉴权服务器就是Authorization Server。如果是对于接入 Auth0 的应用,那么真正颁发 token的工作是由 Auth0 来做的,因此这种场景下,Auth0 是Authorization Server。User Agent: Agent used by the Resource Owner to interact with the Client (for example,a browser or a native application). 一般来说,就是客户端,比如浏览器、Native App等。
了解了这些概念之后,我们结合一个例子,来好好的看一看这些角色之间的交互流程。对于 OAuth 2.0 来说,无论是使用哪一种 授权模式,大体的流程都是:
+--------+                               +---------------+
|        |--(A)- Authorization Request ->|   Resource    |
|        |                               |     Owner     |
|        |<-(B)-- Authorization Grant ---|               |
|        |                               +---------------+
|        |
|        |                               +---------------+
|        |--(C)-- Authorization Grant -->| Authorization |
| Client |                               |     Server    |
|        |<-(D)----- Access Token -------|               |
|        |                               +---------------+
|        |
|        |                               +---------------+
|        |--(E)----- Access Token ------>|    Resource   |
|        |                               |     Server    |
|        |<-(F)--- Protected Resource ---|               |
+--------+                               +---------------+
- 客户端向用户发起授权请求,比如我们使用Google帐号登录时,App上的登录页面,下面会有一个Google登录的按钮
- 用户开始授权,比如我们按下了Google登录的按钮
- 客户端向服务器发起授权请求,用户同意授权(比如点击网页上的Allow/Agree)
- 服务器同意授权,并且颁发token
- 客户端使用token请求资源
- 服务器根据token判断用户身份,如果通过,则返回资源,否则拒绝
总体上来说,用户使用 OAuth 2.0 授权,都是这个流程,但是不同的模式下,流程的细节会有一些不一样。接下来,我们就会看到 第一种授权模式。
Authorization Code Flow

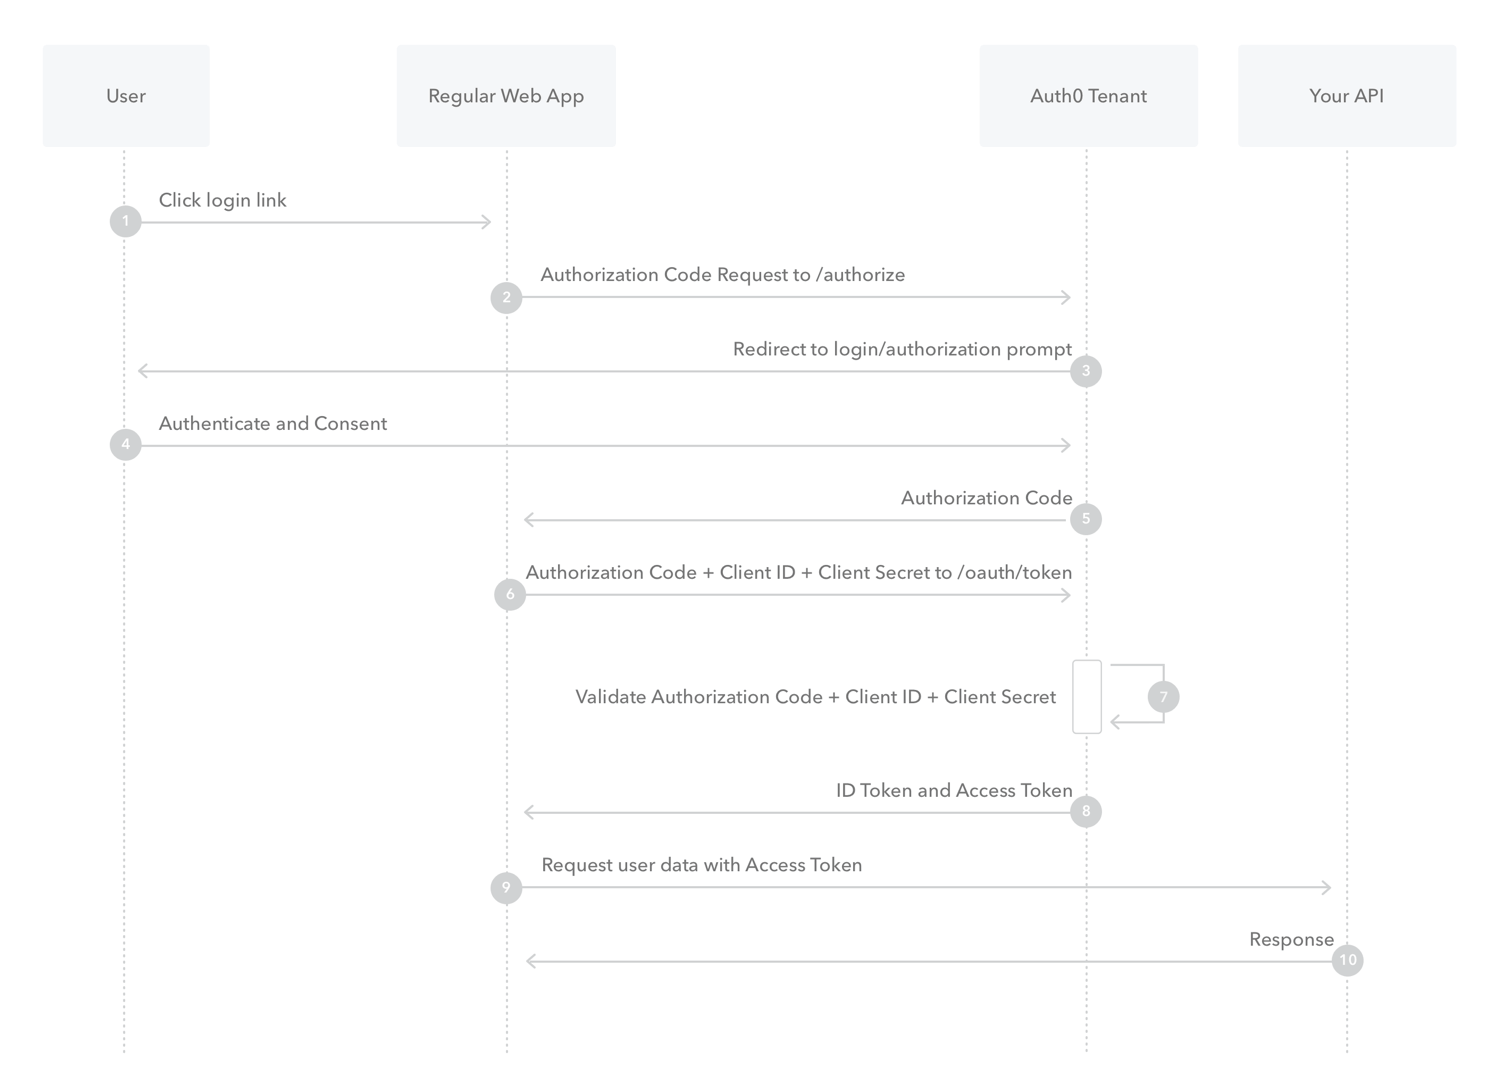
流程图是使用Auth0官方文档提供的,结合这个流程图,我们可以更加清晰的了解到授权过程:
- 用户点击登录按钮,客户端弹出请求授权页面
- 客户端向 Authorization Server 发起请求,要求授权
- Authorization Server 检测到用户没有登录或没有授权过,重定向到授权页面(如果没有登录,先到登录页)
- 用户点击同意授权
- Authorization Server 颁发 Authorization Code,返回给客户端
- 客户端携带 Authorization Code,Client ID,Client Secret 请求 Authorization Server 进行认证
- Authorization Server 验证 Authorization Code,Client ID,Client Secret
- 如果通过,返回 Access Token 和 Refresh Token
- 客户端使用 Access Token 请求API,获取信息
- API 校验 Access Token,如果通过,则返回对应的响应结果
这种模式下,通常是需要后端来参与的,尤其是第6步,通常我们会把 Client Secret 放在后端,让后端拿着 Authorization Code,
Client ID,Client Secret 去请求 Authorization Server,获得 access token 和 refresh token。举个实际例子,假设我的
博客需要接入Google登录,登录后用户可以发表评论:
- 首先我需要在博客的某处放一个Google登录的按钮
- 然后用户点击这个登录按钮,网页重定向到Google的页面,并且带上 cleint_id,state,callback_url。Google会弹出确认提示:是否授权登录?
- 用户同意授权,此时Google将页面重定向回我所设置的回调页面,并且带上 code,state
- 博客回调页面拿到 code,提交给后端,后端代码从配置中心中,读取出 cleint_id,client_secret,用这三个参数,请求Google服务器进行验证
- Google通过验证,返回代表Google用户身份的 access_token,refresh_token。后端立即使用 access_token 访问Google接口,请求用户信息
- Google返回用户信息,后端保存到服务器,主要包括:email,first_name,last_name,avatar_url
- 博客后端颁发自身系统的 access_token,用户使用该 access_token 进行系统内的操作
细节
为什么要后端参与?
client_secret 保存在后端,而不用保存在客户端,这样即使客户端被逆向,也不用担心泄露。
为什么需要 code?
如果直接下发 access_token,那么如果被中间人截获,中间人就可以直接拿着 access_token 请求Google接口了。通过使用 code, 中间人必须拿着 client_secret 才能换取到 access_token,因此避免了攻击。
为什么需要 state?
state 是每次发起授权时,生成的一个随机字符,这样可以把整个授权流程串起来,从而避免安全漏洞(比如可以通过检查回调 之后的state和最开始发起的state是否一致来判断是否是同一个人在操作)。 比如,如果没有state,在SSO登录的时候,我可以发起一个授权请求,然后在Google返回code这一步时中断请求,将URL贴给其它 已登录用户,让他们进行绑定,这样我的Google帐号就可以和别人的帐号绑定在一起,以后就可以通过Google SSO登录访问别人的 帐号了。
总结
这一篇博客中,我们详细了解了OAuth 2.0中的概念,以及最常用的一种授权模式Authorization Code Flow,同时还介绍了其中的一些 细节,比如通常我们会由后端来做code验证等。希望能够给读者带来帮助。
ref:
- https://www.rfc-editor.org/rfc/rfc6749
- https://www.rfc-editor.org/rfc/rfc7636
- https://auth0.com/docs/get-started/authentication-and-authorization-flow
- https://auth0.com/docs/get-started/authentication-and-authorization-flow/which-oauth-2-0-flow-should-i-use
- https://learn.microsoft.com/en-us/azure/active-directory/develop/v2-oauth2-auth-code-flow
 邮件 订阅
邮件 订阅
 RSS 订阅
 Web开发简介系列
 数据结构的实际使用
 Golang 简明教程
 Python 教程